
Hey there :)
As I'm going to my first steampunk festival this weekend, I really needed some jewellery to go with my outfit :)
I decided to make a steampunk cat necklace together with earrings and a bracelet. I also upcycled a ring and made a hair pin.
I decided to make a steampunk cat necklace together with earrings and a bracelet. I also upcycled a ring and made a hair pin.
Materials:
(parchment) paper
(parchment) paper
Polymer clay (e.g. brown, black, metallic colours)
Blade
Roller or pasta machine
Needle tool
Aluminium foil
Tiny screws
Gears (from old watch or bought ones)
Black paint
Jewellery findings (head pins, jump rings etc.)
Pliers
Resin or glaze
Small round silicone mold
Blade
Roller or pasta machine
Needle tool
Aluminium foil
Tiny screws
Gears (from old watch or bought ones)
Black paint
Jewellery findings (head pins, jump rings etc.)
Pliers
Resin or glaze
Small round silicone mold
Instructions:
First I made a sketch of my necklace. I wanted it to be a cat's head with gears and screws and different (faux) materials.
Trace your sketch onto a piece of (parchment) paper so you can use it as a template for the head shape and the different parts.
I used black clay as a base colour and rolled it out pretty thick to give it dimension and to be able to stick your screws and stuff in. If you make it too thin, they will poke out of the bottom. Place your template onto your clay and trace it with a pencil. It will indent into the clay. Then cut out your shape and round off the edges.
Trace your sketch onto a piece of (parchment) paper so you can use it as a template for the head shape and the different parts.
 |
| Sketch Tutorial Steampunk Jewellery |
I shaped the ears and attached them separately and indented them a bit. Then I rolled out two equally small balls from reddish-brown (caramel) clay to put as the cheeks. The chin just stayed as it was traced through the template but I made a nose from black clay. For this I rolled a tiny ball, made it a triangular shape and carefully pushed in the two sides for the nostrils. I poked holes in there and then made a slit into the lower part like cats usually have.
Then I rolled out a sheet of the reddish brown clay and using my template I traced around the parts that I wanted to be a different colour. I put them on the piece where I wanted them to go and then poked holes with my needle tool where the parts meet so it looks sewn or saughtered together.
Once you have added all your clay parts you should texture it as it will be harder later on when you have your metal pieces already in there. Because my mum said "cool, this looks like leather" I changed plans and started texturing it like leather instead of aiming at a metal appearance which I had in mind before.
Leather texture is quite easy to achieve. Simply crumple up a small piece of aluminium foil, straighten it again and crumple again until it shows a nice indented texture. Then just dab it on your piece until you have the desired effect. Turn the foil as you go to make it more interesting. The good thing: you can use the foil again and again and it costs you nothing.
Now the fun part: gears and screws.
 |
| Tutorial Steampunk Jewellery |
Once you have added all your clay parts you should texture it as it will be harder later on when you have your metal pieces already in there. Because my mum said "cool, this looks like leather" I changed plans and started texturing it like leather instead of aiming at a metal appearance which I had in mind before.
 |
| Tutorial Steampunk Jewellery |
Now the fun part: gears and screws.
I had bought some really cheap gears from AliExpress which have an amazing quality and I searched my granddad's cellar for tiny and pretty screws.
I also screwed open some old and not so pretty watches and was dazzled by the treasures I found, especially in the oldest and ugliest watch. I carefully removed each tiny screw and metal piece after each other and put them in trays. I think I opened up about five watches in total but I didn't need all of the parts for this project. The older they are the more gears and stuff the watches have.
So now place your elected treasures onto your cat face. One bigger gear I used for the eye and then randomly put more and more parts in the clay. Press them in as deep as you can. The screws will stay in the clay after baking as the clay has something to grab onto. However, nails, head pins, gears and all other stuff that you stick in clay and that are not bigger at the bottom than at the top will fall out after baking if you wear your jewellery. To prevent that you should take them out carefully after baking and then glue them into place using for example E6000.
I also stuck a small swarovski crystal into the eye gear :)
For the whiskers I used some head pins which I bent at the tip before putting them in. This way the clay grabs onto it as well and they don't have to be taken out and glued.
On the ears I decided to add some 'piercings' using jump rings which also help with putting the chain on later (clever, eh? :D). You can also use small springs, like the one on top of the head.
I then made a cat eye cane.
I also created some beads from resin. I used a very small round silicon mold into which I poured resin and some small gears from my watches. I let it cure and carefully drilled holes into the sides for eyepins to attach them to my bracelet. I also used some more gears and added everything together with jump rings.
I also screwed open some old and not so pretty watches and was dazzled by the treasures I found, especially in the oldest and ugliest watch. I carefully removed each tiny screw and metal piece after each other and put them in trays. I think I opened up about five watches in total but I didn't need all of the parts for this project. The older they are the more gears and stuff the watches have.
So now place your elected treasures onto your cat face. One bigger gear I used for the eye and then randomly put more and more parts in the clay. Press them in as deep as you can. The screws will stay in the clay after baking as the clay has something to grab onto. However, nails, head pins, gears and all other stuff that you stick in clay and that are not bigger at the bottom than at the top will fall out after baking if you wear your jewellery. To prevent that you should take them out carefully after baking and then glue them into place using for example E6000.
I also stuck a small swarovski crystal into the eye gear :)
 |
| Tutorial Steampunk Jewellery |
On the ears I decided to add some 'piercings' using jump rings which also help with putting the chain on later (clever, eh? :D). You can also use small springs, like the one on top of the head.
 |
| Tutorial Steampunk Jewellery |
There are really amazing eye cane tutorials out there where you have all those small stripes in the eye but I chose to keep it simple and quick. Simply make a colour blend from bright yellow to green. If you don't know how to make a colour blend, here is my tutorial for this. Roll your blend out really long so that yellow is on one end and green any the other. Then take a bit of black clay, roll it into a tube and then shape the tube into a leaf shape. Make sure that it has the same length as your blended sheet (with the shape at the sides) and then lay it onto the green end of the sheet. Start rolling it into a log so that you get a cane that has the dark pupil on the inside and then turns from green to yellow.
I rolled just one end of the cane really thin and left the other side thick as I will need the thick part for the bracelet.
I made an indent into my cat where the eye should go, cut a slice from the small side of my cane and placed it into its spot.
I rolled some really tiny snakes of black and placed them above any below the eye as eye lids. I blended them in with my tools and fingers.
The bracelet's main piece is a bronze blank setting into which I put a slice of my cat eye cane, textured it by dragging lines with a needle tool and baked it. There's some scrap clay underneath to save cane. I put some resin on top make it shiny.
So once you're happy with your necklace piece, bake according to the instructions on your clay package and let it cool. Glue in your gears and stuff and then you can use some deluted black (or dark brown) paint to give it an aged look. Make sure that it goes into all the little crevasses and wipe it away from the high points.
I then took some resin and put it on the eye to make it dimensional and give it shine but you can also just glaze it. You can glaze your whole piece if you like or keep it matt.
I then took some resin and put it on the eye to make it dimensional and give it shine but you can also just glaze it. You can glaze your whole piece if you like or keep it matt.
I attached jump rings on the 'ear piercings', then a gear, then a jump ring again until I was pleased with the number. I made sure to switch between silver and bronze coloured gears and big and small ones. For the rest I added a chain from an old necklace.
The bracelet's main piece is a bronze blank setting into which I put a slice of my cat eye cane, textured it by dragging lines with a needle tool and baked it. There's some scrap clay underneath to save cane. I put some resin on top make it shiny.
 |
| Tutorial Steampunk Jewellery |
I also created some beads from resin. I used a very small round silicon mold into which I poured resin and some small gears from my watches. I let it cure and carefully drilled holes into the sides for eyepins to attach them to my bracelet. I also used some more gears and added everything together with jump rings.
If you don't have resin you can also create round pieces from clay and put your gears in. This way it's also easier to attach the eyepins.
For each earring I used a gear and a stamped piece of clay on which I had put some copper powder.
Just using a gear or two would also look pretty. Add an ear hook or a stud. I tried using a plastc stud this time and embedded it into clay. It was fine to put in the oven.
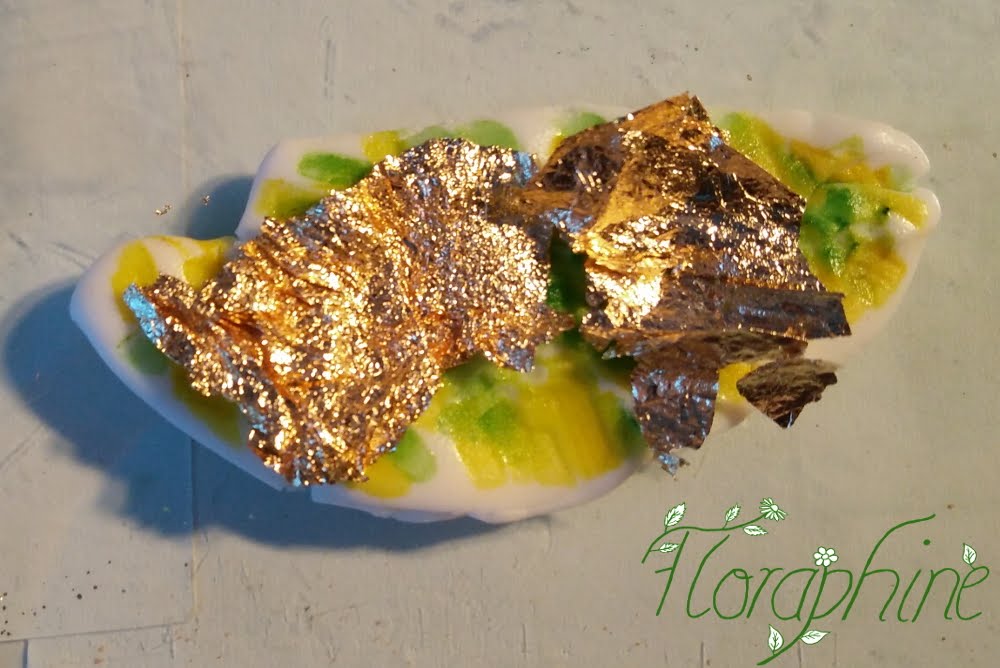
I also have a ring that I attached to the bracelet with a chain. It was silver at first and the stone was missing, so I first molded a stone to go in the empty space. For this I took some translucent clay, flattened it and gave it colour with my alcohol markers. I simply dab the colour on, because otherwise you'll ruin the pen by clay smears. If you have liquid alcohol inks, use those. I chose green and yellow. Then I folded the piece and dabbed on more colour but I think that was too much as it was quite opaque after baking. So don't put too much colour in.
You can also use some gold leaf to give more dimension. Place it on your sheet, fold it and mix it in.
 |
| Tutorial Steampunk Jewellery |
For each earring I used a gear and a stamped piece of clay on which I had put some copper powder.
Just using a gear or two would also look pretty. Add an ear hook or a stud. I tried using a plastc stud this time and embedded it into clay. It was fine to put in the oven.
 |
| Tutorial Steampunk Jewellery |
I also have a ring that I attached to the bracelet with a chain. It was silver at first and the stone was missing, so I first molded a stone to go in the empty space. For this I took some translucent clay, flattened it and gave it colour with my alcohol markers. I simply dab the colour on, because otherwise you'll ruin the pen by clay smears. If you have liquid alcohol inks, use those. I chose green and yellow. Then I folded the piece and dabbed on more colour but I think that was too much as it was quite opaque after baking. So don't put too much colour in.
 |
| Tutorial Steampunk Jewellery |
You can also use some gold leaf to give more dimension. Place it on your sheet, fold it and mix it in.
Then use a mold to shape your diamond or simply roll it by hand.
Bake it and you can glue it into your desired piece of jewellery.
I didn't like the colour of the ring and decided to paint is coppery. I mixed glaze with my copper powder and painted it on. You might need a couple of coats. You can also use acrylic paint or anything you have.
 |
| Tutorial Steampunk Jewellery |
Let dry and then give it a wash of black paint to make it look aged. Mix black acrylic paint with a lot of water and paint it into the crevasses. Wipe away any excess.
Here it is together with a hair pin I also made. It's just clay with some gears, copper powder and another stone. I'm not sure if I'll wear it, yet.
Here it is together with a hair pin I also made. It's just clay with some gears, copper powder and another stone. I'm not sure if I'll wear it, yet.
 |
| Tutorial Steampunk Jewellery |
And here's a picture of the attachment of ring and bracelet:
 |
| Tutorial Steampunk Jewellery |
Here you can see the whole set:
 | |
|
See you soon

Cool! Steampunk mag ich ja eh sehr gerne und dann auch noch in Kombination mit einer Katze! Das ist der Things-I-like-Overload ;D LG Melina
ReplyDeletedankeschön :) Katzen sind sowieso die besten :)
Delete