Hey crafters :)
Today I want to show you how I made an Egyptian jewellery set inspired by ancient jewellery I saw in the British Museum in London. It contains a winged scarab which resembled the sun god Ra.
Tools and Materials:
Polymer clay
Metal powder/ eye shadows
Blade/ xcto knife
Pasta machine/ roller
Small circle cutter
small oval cutter
Jewellery Findings (Chain, jump rings, closures)
Instructions:
So here is the photo I took of the Egyptian jewellery of the British Museum... I know it's horrible.
 |
| Tutorial Egyptian Scarab Jewellery |
However, I found a link to a better photo on
Flickr.
On the base of these photos I started by making a sketch of my design: The scarab in the middle, surrounded by an oval. For the oval I used my oval cutter as a template as I was going to use it later. Then draw an abstract wing shape next to it. You can divide it into more parts if you like. Decide where you want to have the holes. I stuck to the photos I had where I could see a lot of holes.
After you have made your basic sketch, you can trace neatly it onto some parchment paper to make it easier to transfer to the clay.
 |
| Tutorial Egyptian Scarab Jewellery |
Now roll out a sheet of clay (I used black to achieve an aged finish later, but you can us brown or gold or whatever you like) and transfer your sketch to it. Simply put your paper upside down on the clay and rub. The graphite from the pencil should transfer to it. If it doesn't, trace over it with a pencil. Do one oval for the scarab and one wing and then turn it around to trace one opposite wing.
Then cut out your pieces. I cut out my scarab piece with a cookie cutter but of course you cut it by hand.
Also make the holes where they should go.
 |
| Tutorial Egyptian Scarab Jewellery |
Here are all three pieces, positioned how they will be assembled later.
 |
| Tutorial Egyptian Scarab Jewellery |
Now some details. First we'll make the scarab. Take a piece of clay and roll it into a ball first. Then slightly roll it into an oval and flatten it a bit. Check if it fits by placing it on your sketch. This way you make sure, you don't lose the dimensions. Trace the closed wings and that part above them with a needle tool and slightly indent it at the top.
 |
| Tutorial Egyptian Scarab Jewellery |
Put the body on your oval.
Now we make the head. It looks harder than it is. Basically, you cut out a little half circle and cut out four spikes, too longer ones in the middle and two shorter ones at the sides. Smooth out any sharp edges. Don't forget to check your proportions by laying it on your sketch. Now just roll two little balls of clay and attach them as the eyes.
Also roll a really thin snake of clay.
 |
| Tutorial Egyptian Scarab Jewellery |
Attach the head to the body of the bug. You can add some texture by making lines on the body and head with a needle tool or toothpick.
From the thin snake of clay, cut pieces for the legs and antennas. For the antennas we'll just need some very small pieces, make sure they're pointy at the ends. I also left some space to add a bead later for the scarab to hold.
To measure the length of your legs, lay them on your piece or sketch to get the right size. Then cut the excess, bend them into legs and attach them to your bug. As you can see, I needed long legs, medium and small ones, but it it really depends on your piece.
 |
| Tutorial Egyptian Scarab Jewellery |
Now we want to make the legs more scarab-like. Take a needle tool (or a toothpick) and at an angle drag some lines starting from the legs outwards (see photo). Do this with all of the legs.
 |
| Tutorial Egyptian Scarab Jewellery |
Now we move on to the wings. You can make the feather-like shapes different ways but for me this was the easiest method.
First roll out a sheet of clay at a medium thickness and then cut strips that are thicker on one side and thinner on the other. Hold your blade at an angle to do this. Then change the angle to get alternating strips - one time having the thick part in the left, the next time on the right. Now everywhere you have a thick side, cut the clay at an angle again to obtain a half feather. Leave the other side for now.
 |
| Tutorial Egyptian Scarab Jewellery |
Now start placing your feathers on the wings. It's crucial that you start at the top an outer edge (see photo) if you want to imitate this exact design, as all the other pieces will overlap the first. So position your first feather with the thin end over the outer border. Then cut your excess. As you can see, I traced this rounded shape on the inside of the wing following my reference photos. This will be covered with different feathers. Position your next large feather overlapping the first slightly and continue until you have this part covered. You'll have to cut the pieces smaller and smaller the more you move to the bottom. Try to match the other wing by counting your feathers and checking now and then if they're more or less symmetrical. But don't worry too much about it. It's art. Enjoy the process.
 |
| Tutorial Egyptian Scarab Jewellery |
For the small feathers in the middle sections I cut out very small circles using the smallest size of my homemade circle cutters. Check out the tutorial
here.
Then start at the bottom and place row after row of small feathers on your wing.
 |
| Tutorial Egyptian Scarab Jewellery |
This is what the project should look afterwards. You can add some texture by crushing a piece of aluminium foil into an irregular ball and carefully dabbing it onto some areas of the necklace pieces. This gives it an aged and worn look once you add colour. You can also make fine cuts with your knife as texture. But don't overdo it.
 |
| Tutorial Egyptian Scarab Jewellery |
Before applying any colours, we'll create a matching bracelet.
First draw out a shape you want your bangle to be. I chose to make it larger in the middle. Make sure you measure your wrist to know how long your strip has to be. After you have the basic shape, fold it in half, correct any irregularities and cut it out folded, so that it is symmetrical.
 |
| Tutorial Egyptian Scarab Jewellery |
You can either just make your bangle from clay or put a sheet of metal in the middle to make it sturdier. For example you can use soda can metal. In order to do this, cut open your can and tape your template to it. Trace it and then cut out the shape.
 |
| Tutorial Egyptian Scarab Jewellery |
Now we make a pretty stone as centrepiece of the bangle and a small one for the necklace. For this, roll out some translucent clay, apply alcohol ink to the sheet in the colours of your choice (I don't have bottled ink so I dabbed on colour with my alcohol markers) and then with your blade shave of some wax from corresponding crayons. These little pieces make really nice inclusions in your clay. Put them on your clay sheet, fold this and roll it out again. You can repeat the ink/crayon process but remember that the more colour you put in, the more you lose the transparency.
Mix your clay until you have achieved your desired patterns and colours and then roll it into a sheet again.
 |
| Tutorial Egyptian Scarab Jewellery |
For the necklace we need a very small stone for the scarab to hold. For this, either take your smallest round cutter or try to cut it by hand. Round of the edges with your fingers.
 |
| Tutorial Egyptian Scarab Jewellery |
To give it more dimension, roll out a sheet of translucent clay as thin as possible and carefully lay it on top of your stone. Cut around and smooth out any irregularities with your fingers.
 |
| Tutorial Egyptian Scarab Jewellery |
Create a bigger stone too for you bracelet. Choose a cookie cutter that has the right size, put some kitchen wrap on top of your clay sheet and then cut out the circle. This way the edges are already rounded. Place your thin sheet of translucent clay on top again, cut around the edges and smooth out any irregularities.
Now you can bake the stones separately first (that's what I did) and throw them into iced water right after baking. This makes them more translucent. However, this way the the stones won't bend with the piece and therefore you might encounter problems once you bend your bracelet. I show you what I mean further on.
Anyway, before you position your stone, consider texturing the bangle. Of course I forgot to do it and had to come back to it with the stone already in place. I recommend texturing by pressing in sandpaper as this gives it a really nice effect. Now place your stone in the centre of your bangle.
 |
| Tutorial Egyptian Scarab Jewellery |
To give it some more interest, you can cut a thin strip of clay and wrap it around the stone. I also did this with the smaller one on the necklace.
Now we'll create the same feather pattern as on the necklace. You might need to draw another rough template for this, as it will probably have a different size.
Then start arranging your feather shapes like you did on the necklace.
 |
| Tutorial Egyptian Scarab Jewellery |
Now onto the exciting part: the colouring. You can use metal powders, eye shadows or paint it later with acrylics. I used my golden metal powder first by dabbing it on lightly with my fingers. To have some colour, you can apply eye shadow in a shade corresponding to your stone. I recommend applying it with a brush to get into more spots. If it doesn't stick because you have already too much powder on there, you can use some liquid clay.
Don't forget to do the same with the necklace parts.
 |
| Tutorial Egyptian Scarab Jewellery |
Now remember when I told you, you might experience problems if you bake the stone in advance? Well once I bent my bangle into shape and attached it to the metal base, I got some ugly gaps where the stone was attached to the raw clay because obviously it couldn't bend with the piece. I only noticed that after baking. You should keep this in mind. However, you can fix it of course. Roll out some more clay, stuff the gaps (liquid clay makes it easier), apply colour again and no one will notice. However, this will always stay a weak point.
 |
| Tutorial Egyptian Scarab Jewellery |
Once you have attached your outer part and cut any excess, I recommend baking it for 15 minutes so you don't distort the shape. Then roll out some more clay and cut another bangle part using your template. Texture that and apply colour as before, then attach it to the inner side of the bangle. Cut any excess again and now you'll just need to hide the seams by cutting a thin strip of clay and attaching it all around with liquid clay. Cut any excess, smooth out the seams and don't forget your colouring. Bake one last time and it's finished.
 |
| Tutorial Egyptian Scarab Jewellery |
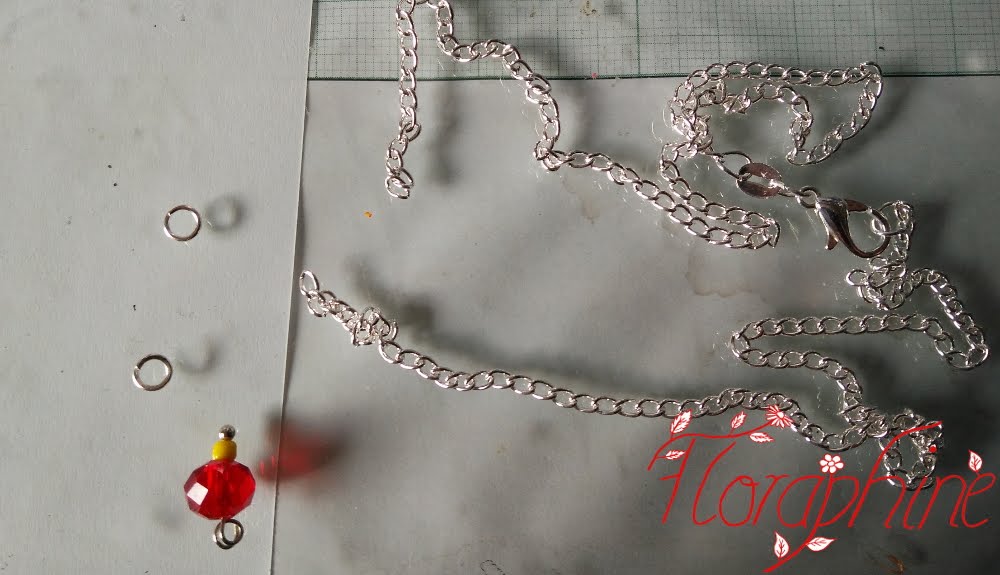
If you experience that the bangle sits to loose on your arm, you can screw some holes into the ends and add a chain and/ or a closure. That's what I did.
Now just add a piece of chain and closure to your necklace measuring it to fit your neck and the clothes you want to wear. You can also attach chain to the holes we made at the bottom. Always twist open a jump ring first (never pull it open!) and attach that together with your piece of chain.
And here is the finished set:
What do you think?
 |
| Tutorial Egyptian Scarab Jewellery |
You should wear it with a summery white dress (the fabric underneath is the one I wore with it)
 |
| Tutorial Egyptian Scarab Jewellery |
And some detail photos for you:
 |
| Tutorial Egyptian Scarab Jewellery |
 |
| Tutorial Egyptian Scarab Jewellery |
I hoped you liked this tutorial. Let me know if you have any questions :)
See you soon


