Hey there :)
Because my family has sort of grown a significant bit over night (which I'm so happy about, but I don't want to bore you with private details :D) I decided that I needed something to put on all of my photos of my new (and old) family members.
I wanted to make a photo tree. Once because I love trees and nature and also because it reminds me of a 3D family tree :)
Firstly I made a base from wire, then added clay and painted it.
Materials:
Wire
Painter's tape
Clay ( polymer or air-dry)
Tools for the tree bark and soil (like wire brush, tooth brush, toothpicks, etc.)
Roller
Needle nose pliers
Paint
 |
| Tutorial Photo Tree |
I first cut off some pieces of wire about 20-30 cm long. The number really depends on how many branches you need.
I twisted a few together in the middle and left a bit for the roots untwisted and a larger part for the branches.
I wrapped around a few more pieces but you can also add more later.
Then I twisted 2 or 3 together to make the branches and left them untwisted at the ends.
I curled the ends inwards with needle nose pliers and then used my fingers to create spirals for holding the photos.
On the left you can see how it's done.
Some of the wires were a bit too short, there I added more wires by twisting them around the existing branch. It doesn't have to look very neat as it's gonna get covered anyway.
Add as much wires in as you need and that you feel look nice.
Once I was happy with the number of spirals on the branches and had enough for my photos I wrapped the whole tree except the very ends of some twigs, the spirals and the roots, in painters tape. If you're planning on using polymer clay, make sure it's oven safe.
 |
| Tutorial Photo Tree |
Now onto the clay part. I first cut the roots a bit shorter and bent them downwards. I then took a bit of air-dry clay and stuck the roots in there and pushed down. Then I covered the wires with more clay and added more at the bottom to give it a solid base. Make sure that you push it down to your work surface so the tree can stand on its own.
Remember when using air-dry clay you have to keep your project moist until you're fully done. I always use a small spray bottle for that. Once I notice the clay getting harder to work with and I see some parts drying already, I spray everything with water and can continue.
I shaped my base as a little hill and textured it using my homemade toothpick tool (see picture), a brush tool and sandpaper. You can also just use a regular toothpick and for example an old toothbrush.
When you texture something with several tools always use the one that makes the biggest marks first and then move onto the smaller ones. This makes it more natural.
Now cover the tree itself.
For that I rolled out a sheet of clay and then cut thin strips to wrap around the tree. This probably doesn't work with all brands of air-dry clay. If it doesn't, simply take small pieces of clay and push them on your tree to cover it up.
It worked fine with my clay, so I wrapped around the strips on the trunk up to the branches and even the little twigs. Only the spirals have to be left as they are. This wrapping technique helps distributing the clay evenly and is a very fast and easy way to do this.
On the very small twigs it was sometimes better to roll a little sausage, stick it on there and then roll it until it covered the wire completely and looked like a tree twig.
Afterwards you need to smooth out all of the lines that appeared through the wrapping. If you use air-dry clay this can be done very easily with water and your fingers or with a flat tool.
It doesn't have to look perfect as it's a tree after all and we will add texture anyway.
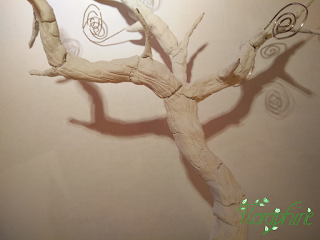
Now the texturing. For that I used my toothpick tool first and scraped it carefully down the trunk to create lines. Then I used my wire brush to make finer lines - so again working from big to small. This wire brush is really amazing for creating wood texture because you have all these fine wires next to each other which saves a lot of time compared to a needle tool (which of course you can use instead). I also used it for my faux wood stars.
Once you're happy, let it dry or bake if you're using polymer clay.
You can also bake (some) air-dry clay to quicken the drying process but be prepared to have some or a lot of cracks in the clay as it's not supposed to dry that quickly.
Of course I couldn't wait and baked it :D
So here is my tree all cracked:
 |
| Tutorial Photo Tree |
However, this is not a problem. You can add more clay afterwards to fix the cracks. In order to do this, wet the tree (with your spray bottle or your hands) and then take a bit of clay with your fingers and push and smear it into the cracks. You might have to moisten the soft clay too, to make it really smeary and help blend everything together.
Smooth out any huge bumps (small bumps in the right places give the tree a natural look) and texture the areas where you had to add clay again like we have done before.
Then let everything dry and hope for no more cracks :D
I still had one crack in the middle of the tree as this seems to get a lot of pressure from the top and the bottom. I glued it with super glue.
Of course if you're using polymer clay you probably won't have any cracks.
After drying (or baking) you can give your piece a nice tree colour or even paint it blue or red or anything if you prefer. I usually like my trees natural and painted it a solid brown first including the wire spirals. You might need several coats of paint, especially on the wires as they don't take it as nicely.
The hill got a mixture of green and brown.
Then to highlight the cool texture we have created, I mix some darker brown (or even black) and thin it out a lot with water. I paint this on and make sure it gets in all the little cracks and low spots.
If you haven't thinned it out enough and you get some on high areas you can carefully wipe it away with a paper towel. I also got some paint on my hill when it drippled down but that wasn't a big deal, I just spread his out and used it on the hill as well.
Finally we do some dry-brushing. I mixed a very light brown and wiped my brush on a paper towel so that there was hardly any paint left. Then I lightly went over the tree. This highlights the raised areas and helps to add even more texture. You can also use a bit of green to make the tree look mossy.
Let everything dry completely and seal it with some glaze (especially if you have used air-dry clay) to make it water and scratch proof. Especially the spirals need to be sealed otherwise the paint will scratch away.
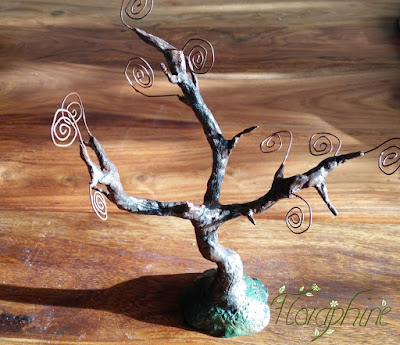
Here my final result:
 |
| Photo Tree from Air-Dry Clay |
Then just shove your photos onto the spirals (the several rings hold the photo tight) and you're done!
Thank you for your attention, I hope you liked this a bit more detailed tutorial. If you did let me know and leave me a comment, and feel free to ask any questions.
See you soon
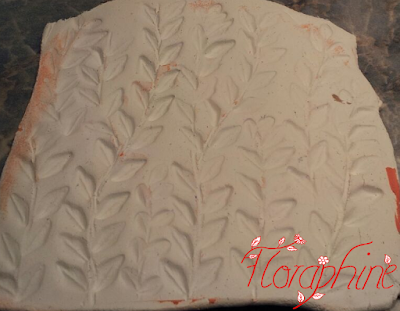
 First I made a leave stamp. For that I took a bit of clay (I used air-dry clay but you can also use polymer clay).


